This is the 3rd article in this series and deals with prerequisites for ADFS:
- SharePoint 2013 and ADFS 2.0 Installation Guide
- Lab Environment
- Install Windows Certificate Authority
- ADFS Prerequisites
- How to Install and Configure ADFS 2.0
- Configure User Profile Service for ADFS 2.0
- Configure Search to Crawl Web Applications Using Claims and ADFS 2.0
- Configure People Picker to resolve ADFS Identities
- Adding Host Name Site Collections to Existing Web Application Configured to use ADFS 2.0
- Validate Configuration with “Claims Viewer Web Part”
Below is a list of prerequisites that we need to take care of prior to installing ADFS:
- Create DNS Entry
- Create a Service Account
- Create ADFS Certificate Template
- Request Certificates
Create DNS Entry
In this step we’ll create a DNS A-record called “logon” to be used by applications that authenticate via ADFS. For example in SharePoint this would be the provider URI:
This could also be a CNAME DNS entry, but I prefer to create A-records when dealing with SharePoint due to using Kerberos for authentication. This will keep all my DNS requests consistent and won’t raise any red flags when working when troubleshooting Kerberos issues.
- On “DC1” open the “DNS Manager” console
- Expand the server node
- Expand “Forward Lookup Zones”
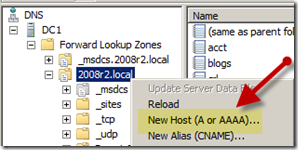
- Right click on the DNS domain (i.e. 2008r2.local in this example) and select “New Host (A or AAAA)”
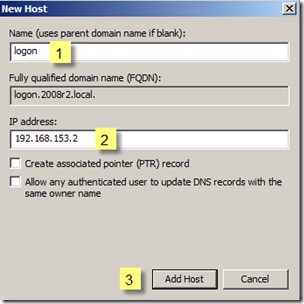
- In the “New Host” dialog for the A-record enter “logon” and the IP address of the server that will host ADFS followed by clicking the “Add Host” button.
- Verify the entry has been created
Create Service Account
In this step we’ll create the service account that the “AD FS 2.0 Windows Service” executes under. In my lab I’ll create the account in the “ADFS Service Accounts” OU however it could be provisioned anywhere in the directory.
- Launch “Active Directory Users and Computers”
- Navigate to the location in the directory where you wish to create the account. In this example we’ll create the account in the “ADFS Service Account” OU.
- Identify the OU or container where you wish to create the service account and select “New” –> “User”
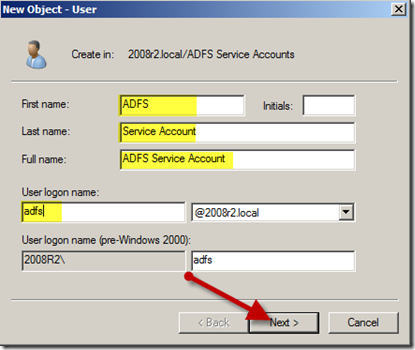
- Fill out the required fields in the “New Object – User” screen and click “Next >” to continue
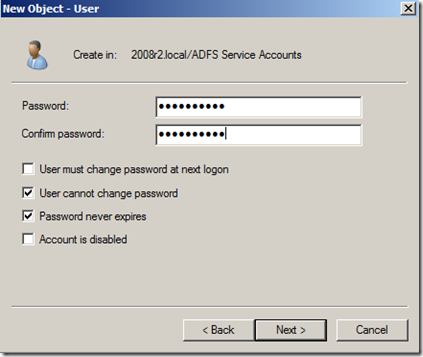
- Enter the desired password and select the “User cannot change password” and “Password never expires” check boxes. Click “Next >” to continue.
- Review the details of the new user account and click “Finish”
- Verify the account has been created by navigating to the container or OU it was created in.
Create ADFS Certificate Template
Next we’ll create a copy of the “Web Server” template to be used when requesting certificates for the “Service Communication”, “Token-decrypting”, and “Token-signing” certificates in ADFS. During this process we’ll need to grant the “Read” and “Enroll” permissions on the template to the following:
- ADFS service account
- User account that will request the certificate (i.e. SP_Admin in our example)
- AD Group that contains the machine account( s ) from where the certificate will be requested (“WebServers” in our example).
The certificate template will be based off the “Web Server” template and consists of the following steps:
- Open the “Server Manager” console and expand the “Roles” –> “Active Directory Certificate Services” node.
- Highlight the “Certificate Templates” entry
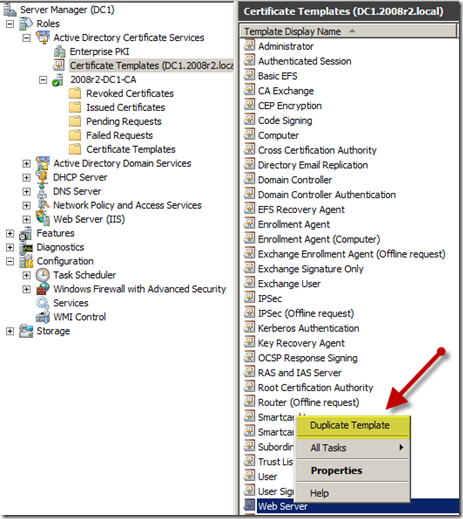
- Right click the “Web Server” template in the right hand pane and select the “Duplicate Template” option
- In the “Duplicate Template” dialog select the “Windows Server 2008 Enterprise” radio button
- Enter “ADFS” in the “Template display name:” and “Template name:” fields
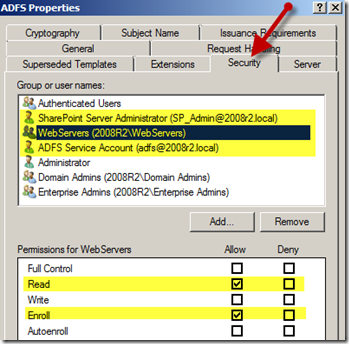
- Click the “Security” tab
- On the “Security” tab of the “Properties of New Template” dialog click the “Add” button
- Add the “ADFS Service Account” that was created in the previous step
- Select the “Allow” checkboxes for the “Read” and “Enroll” entries.
- Repeat for the user account or group that contains the user who will request the ADFS certificates. In our example the requesting user is “SharePoint Server Administrator” but it could be a group like “Domain Admins”.
- Repeat the process for the computer or group containing the computer from where the certificate will be requested. In our example the “WebServers” group contains both Domain Controller/ADFS server as well as the SharePoint Servers, however we’ll request the certificates from the Domain Controller.
- Click “OK” to create the template.
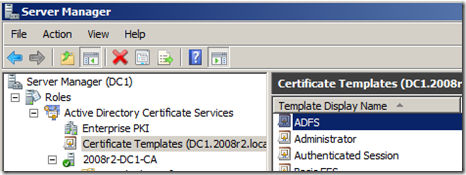
- The “ADFS” template should now be displayed in the list of “Certificate Templates”
Request Certificates
In this step we’ll process the request to create the “Service Communication”, “Token-decrypting”, and “Token-signing” certificates used in ADFS. We could request these through multiple methods and also post installation, but requesting them prior to the deployment of ADFS will provide us the opportunity of using the “Service Communication” certificate during the ADFS installation process. ***Please note if you are using 3rd Party or Self-Signed Certificates you can skip this step***
Create Service Communications Certificate
- Open the Microsoft Management Console (Start –> Run –> mmc.exe )
- Click File –> Add/Remove Snap-in….
- Select “Certificates”, click “Add” followed by “OK”
- Navigate to Certificates (Local Computer) –> Personal –> Certificates
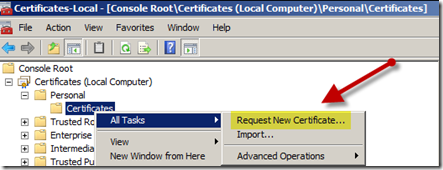
- Right click the “Certificates” folder and select “All Tasks” –> “Request New Certificate”
- The “Certificate Enrollment” wizard will be displayed. Click “Next”
- Select the “Active Directory Enrollment Policy” option and click “Next”
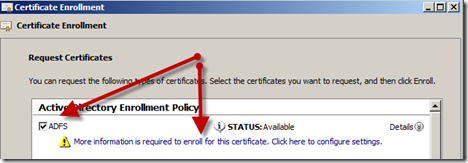
- Select the “ADFS” template and click the “More information is required to enroll for this certificate.” link
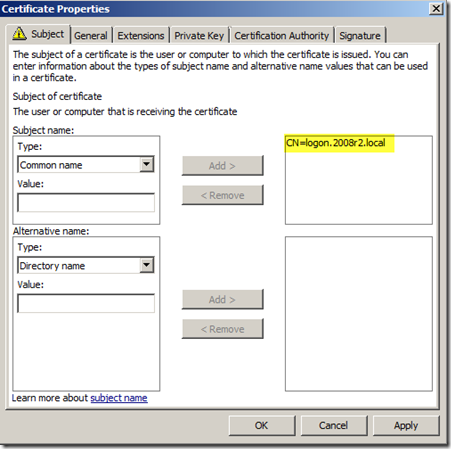
- On the “Subject” tab select the “Common Name” drop down option in the “Subject name:” section
- In the “Value:” field type in the FQDN which is the “logon.2008r2.local” DNS A-record we created in a previous step
- Click the “Add >” button to insert the entry to the right hand column
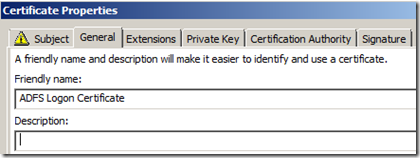
- Click the “General” tab and fill in the friendly name and description of the certificate
- Select the “Private Key” tab and verify under the “Key options” section that the “Make private key exportable” check box is selected
- Click “OK’
- The yellow caution sign will no longer be present and you can click “Enroll” to process the request
- The enrollment process should display a successful status
- Click “Finish”
Create Token-Decrypting and Token-Signing Certificates
We need to repeat the same steps to create both the “Token-Decrypting” and “Token-Signing” certificates so I’ll provide the steps minus the screen shots.
Token-Decrypting
- Navigate to Certificates Computer) –> Personal –> Certificates
- Right click the “Certificates” folder and select “All Tasks” –> “Request New Certificate”
- The “Certificate Enrollment” wizard will be displayed. Click “Next”
- Select the “Active Directory Enrollment Policy” option and click “Next”
- Select the “ADFS” template and click the “More information is required to enroll for this certificate.” link
- On the “Subject” tab select the “Common Name” drop down option in the “Subject name:” section
- In the “Value:” field type in the FQDN “decrypting.2008r2.local”
- Click the “Add >” button to insert the entry to the right hand column
- Click the “General” tab and fill in the friendly name and description of the certificate
- Select the “Private Key” tab and verify under the “Key options” section that the “Make private key exportable” check box is selected
- Click “OK’
- The yellow caution sign will no longer be present and you can click “Enroll” to process the request
- The enrollment process should display a successful status
- Click “Finish”
Token-Signing
- Navigate to Certificates (Local Computer) –> Personal –> Certificates
- Right click the “Certificates” folder and select “All Tasks” –> “Request New Certificate”
- The “Certificate Enrollment” wizard will be displayed. Click “Next”
- Select the “Active Directory Enrollment Policy” option and click “Next”
- Select the “ADFS” template and click the “More information is required to enroll for this certificate.” link
- On the “Subject” tab select the “Common Name” drop down option in the “Subject name:” section
- In the “Value:” field type in the FQDN “signing.2008r2.local”
- Click the “Add >” button to insert the entry to the right hand column
- Click the “General” tab and fill in the friendly name and description of the certificate
- Select the “Private Key” tab and verify under the “Key options” section that the “Make private key exportable” check box is selected
- Click “OK’
- The yellow caution sign will no longer be present and you can click “Enroll” to process the request
- The enrollment process should display a successful status
- Click “Finish”
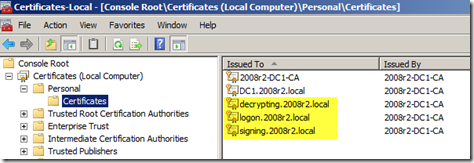
The local certificate store should now list the logon, decrypting, and signing certificates.




I had to issue the certificate template before being able to use it. This is done in Active Directory Certificate Service role / 2008r2-DC1-CA / Certificate Template -> New -> Certificate Template to Issue -> ADFS.
Don’t you need 3 DNS (logon, decrypting and signing) instead of just one (logon) ?
did you need all 3 of them to contain DNS information?