Overview
This is the first article in our SharePoint 2013 and ADFS 3.0 Installation and Configuration series of articles. In this article we just showcase the lab that we have setup where this series of articles was based as well as an explanation of the authentication flow associated with ADFS.
- SharePoint 2013 and ADFS 3.0 Installation Guide
-
Part 1: Lab Environment
- Part 2: Install Windows Certificate Authority
- Part 3: ADFS Prerequisites
- Part 4: How to Install and Configure ADFS 3.0
- Part 5: Configure Relying Party in ADFS 3.0
- Part 6: Configure Web Application for ADFS
- Part 7: Configure User Profile Service for ADFS
- Part 8: Validate Configuration with “Claims Viewer Web Part”
- Supplemental 1: Configure People Picker to resolve ADFS Identities
- Supplemental 2: Adding Host Name Site Collections to Existing Web Application Configured to use ADFS
- Supplemental 3: Configure Automatic Sign-In with Mixed Authentication
Lab Environment
- Domain: splab.local (All machines joined to this domain)
- Domain Controller
- DC1.splab.local
- Windows 2012 R2
- ADFS 3.0 Server
- 192.168.189.10
- SQL Server
- SQL1.splab.local
- Windows 2012 R2
- SQL 2014 Enterprise
- 192.168.189.11
- SharePoint Application Server
- SP-APP-1.splab.local
- Windows 2012 R2
- SharePoint 2013 SP1
- 192.168.189.15
- SharePoint Web Front End Server
- SP-WFE-1.splab.local
- Windows 2012 R2
- SharePoint 2013 SP1
- 192.168.189.20
- Workstation:
- SP-Win7-01.splab.local
- Windows 7 SP1
- 192.168.153.100
Authentication Process Flow
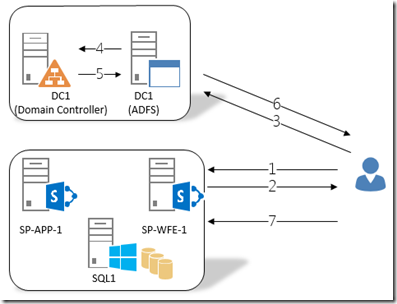
The above image and steps below illustrate the authentication process with SharePoint functioning as the “Relying Party” and ADFS as the “Identity Provider”.
- User browses to the site (https://spt.splab.local )
- SharePoint receives the request and if more than one authentication provider is configured will present the user with a pick list (i.e. “Windows Authentication” and “ADFS”). If the user selects the ADFS provider then SharePoint will redirect the client to https://adfs.splab.local/adfs/ls
- ADFS receives the request and a login form is provided to the user.
- ADFS authenticates the user with the appropriate identity provider (Active Directory)
- ADFS creates the logon token
- ADFS responds to the client with a token and the WS-Federation passive protocol URL for SharePoint
- The authenticated client presents token to WS-Federation passive protocol URL for SharePoint


Leave a comment