Overview
This is part 6 in our SharePoint 2013 ADFS 3.0 Installation and Configuration series of articles. In this article we will go over configuring the SharePoint web application to use ADFS as one of its authentication providers.
- SharePoint 2013 and ADFS 3.0 Installation Guide
- Part 1: Lab Environment
- Part 2: Install Windows Certificate Authority
- Part 3: ADFS Prerequisites
- Part 4: How to Install and Configure ADFS 3.0
- Part 5: Configure Relying Party in ADFS 3.0
-
Part 6: Configure Web Application for ADFS
- Part 7: Configure User Profile Service for ADFS
- Part 8: Validate Configuration with “Claims Viewer Web Part”
- Supplemental 1: Configure People Picker to resolve ADFS Identities
- Supplemental 2: Adding Host Name Site Collections to Existing Web Application Configured to use ADFS
- Supplemental 3: Configure Automatic Sign-In with Mixed Authentication
Configure SharePoint Web Application
In the final steps for this post, we’ll configure the “SharePoint Lab – SPT” web application to use ADFS as a “Trusted Identity Provider“. Make sure you have created your certificates from Part 4.
Create Trusted Identity Provider
- Verify location of token signing certificate. This location will need to be recorded in the PowerShell script to provision the “Trusted Identity Token Issuer“ and should be located on one of the SharePoint servers in the farm we are working with. In this example we’ve placed a copy of the “ADFSSign.cer” file in the D:\Software\Microsoft\ADFS\Certs directory:
- Now that the certificate is in place we’ll need to execute the following PowerShell script on the SharePoint server (SP-WFE-1 in our example). The script will setup the Trusted Identity Token Issuer, 2 claim type mappings, sign-in URL, realm, import the token signing certificate and set the name and description.
$cert = New-Object System.Security.Cryptography.X509Certificates.X509Certificate2("D:\Software\Microsoft\ADFS\Certs\ADFSSign.cer")
$map1 = New-SPClaimTypeMapping "http://schemas.microsoft.com/ws/2008/06/identity/claims/role" -IncomingClaimTypeDisplayName "Role" –SameAsIncoming
$map2 = New-SPClaimTypeMapping "http://schemas.xmlsoap.org/ws/2005/05/identity/claims/emailaddress” -IncomingClaimTypeDisplayName "Email Address" –SameAsIncoming
$realm = "urn:sharepoint:spt"
$signinurl = "https://adfs.splab.local/adfs/ls/"
$ap = New-SPTrustedIdentityTokenIssuer -Name "ADFS" -Description "ADFS Federated Server" -Realm $realm -ImportTrustCertificate $cert -ClaimsMappings $map1, $map2 -SignInUrl $signinurl -IdentifierClaim $map2.InputClaimType
- To validate the script ran successfully the “Get-SPTrustedTokenIssuer” cmdlet can be executed to verify the results. There are 5 key pieces of information to validate:
- ProviderUri (SharePoint will send authentication requests to this Uri)
- ProviderRealms (SharePoint will send the URN to ADFS which in turn will use the realm value to match it up with the appropriate relying party entry)
- ClaimTypeInfomation (This verifies the two claim mappings that we created during the script execution and should match up with what is configured in the ADFS relying party entry)
- Signing Certificate (Verify the “Token-Signing” certificate is listed here)
- Name (The name entry will be listed in the Web Application as an option under the “Trusted Authentication Providers”)
Configure Web Application Authentication Provider
Now that the “ADFS” Trusted Authentication Provider has been provisioned we can configure the Web Application to use it.
- Logon to the Central Administration site
- Click on the “Manage web applications“ link under the “Web Applications” section
- Highlight the “SharePoint Lab – SPT” web application and click on the “Authentication Providers” in the ribbon
- Click the “Default” zone link
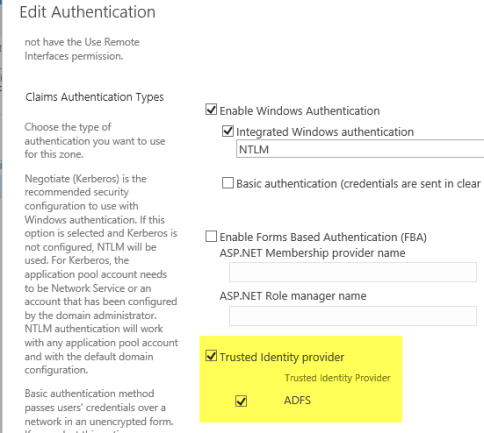
- In the “Claims Authentication Types” section of the “Edit Authentication” screen, select the “Trusted Identity Provider” and “ADFS” checkboxes.
- Click “Save” to commit the changes (**this may take a minute or two**)
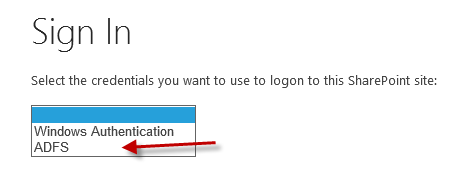
Now the web application is configured to use both the Claims/NTLM and ADFS authentication providers. If we were to browse the root site at https://spt.splab.local a “Sign In” page would be displayed asking which provider to use:
Test Authentication Provider
At this point we can’t select “ADFS” as an authentication option because no permissions have been set on the site using the email address identity or roles from ADFS. We need to logon to the site as a Site Collection Administrator and setup the permissions.
- Navigate to https://spt.splab.local
- At the “Sign In” page select the “Windows Authentication” option
- Click the gear icon in the upper right hand corner of the page and select “Site Settings“
- In the “Users and Permissions” section click the “Site collection administrators” link
- When entering in the users to add to the group you’ll see 3 entries for each account. Two of these are associated with ADFS (Role, Email-address) and the third one is the windows authentication account. You won’t be able to tell them apart unless you hoover over the accounts, but add a user or role from the ADFS provider. In a later post we’ll outline a method to have the people picker resolve the accounts in ADFS.
- Click “OK“
- Click the user name in the upper left hand corner and select the option to “Sign Out“
- On the “Sign In” page select the “ADFS” option
- If successful you’ll be logged into the site using the email address claim attribute in ADSF.
Conclusion
The “SharePoint Lab – SPT” web application has now been configured to use both the windows and adfs authentication providers. In a follow up post we’ll cover how you might get rid of the “Sign In” page.


I followed the instructions, and cannot get past the “Sorry, this site hasn’t been shared with you” (access denied) message. I’ve gone back through the instructions to make sure I didn’t miss anything, and for some reason I cannot get past this. I see the accounts listed with email role, and ad show up when resolving the user in the Site Collection Admins. Is there anything that needs to be configured in the web.config?
Is the user you are trying to log in as a Site Collection Administrator or Site Owner already? Make sure its the ADFS account that has been added two either of those roles as well.
Brian, I have the same issue. Did you find solution?
Has anyone solved this issue? I am having pretty much the same issue with SharePoint 2013 and ADFS v3. When SAML is enabled users are able to login with SAML/ADFS authentication, but all existing permissions are missing. When logging in with the same user account with integrated windows auth everything is fine.
What do you mean all existing permissions are missing? You understand that a SAML/ADFS account and a Windows Auth account are two seperate accounts as far as SharePoint is concerned. So you need two separate permissions; one for each account.
I am not sure that I understand that. I think I was afraid that this was the case. Isn’t it possible to link the two logins? We have a lot of existing users with permissions already set. We are currently deploying ADFS/WAP to replace our existing TMG setup. When logging in through WAP (pre-auth with claims) the user has no permissions on the SharePoint what so ever…
Can the User Profile Service be to any help?
Any help is highly appreciated…
Jonatan
Hi Jonathan,
As Wes mentioned SharePoint considers those two different accounts. For example your ADFS account will appear something like “I:0#.w|mydomain\admin” which to SharePoint is a different account than “mydomain\admin”.
You can run the move-spuser cmdlet to remap your windows accounts over to the claims provider format and they’ll retain the same permissions as before.
I got same exception as what you mentioned before. what I figured out was when I added site administrators, I needed to type the user name as email format same as what I defined in the AD. Since you didn’t configure your people picker at this stage, the people picker basically accepts whatever you type and show two entries there. I found out the exception came out if I don’t type email.
real good article. a side question, I noticed that the ie popup a dialog to ask user name and password like the AD formation. just wondering if I want to show a page to allow user to enter the user name and password. what setting would I need to configure? I noticed there a custom sign in page field available in the “Claims Authentication Types” section of the “Edit Authentication” screen, what is the value we should configure?
Thanks
Please help.
when trying to authenticate with ADFS to SharePoint, Nothing happens, it keeps asking to enter my smart card pin over and over. I granted the ADFS user account full control permission to the site collection. what am I missing? thanks
thanks for your document. i hava 2 site in sharepoint.I just setup for 1 site authentic throught ADFS and it is working but when i setup for site 2 , it isnot working. how can i setup for 2 site authentic throught ADFS. while i lonon for site 1 and it automatic logon for site 2.
Please give me some advice.
Thanks alot